This blog article will address two items:
- How the Bend Deduction Tables (BDT) work
- What the BDT value REALLY means (or how to get a meaningful value to put into the BDT)
1. HOW THE BEND DEDUCTION TABLES WORK
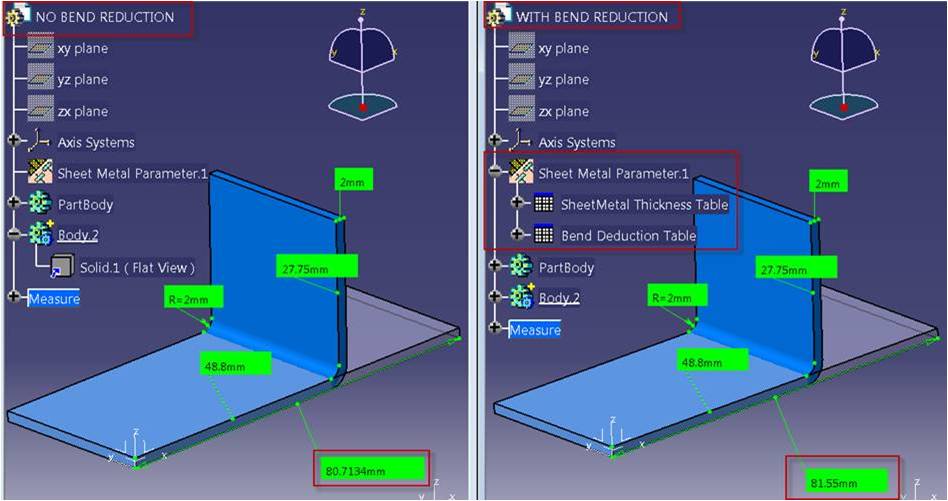
Below is a simple example for illustration purposes. Two parts, with the same final 3D part dimensions. One without BDT’s, the other with BDT’s. Note the difference in the length of the flat pattern. (Click on images to enlarge, and then hit Back in your browser)
The Bend Deduction Tables are a series of Excel files defining allowable values and value ranges for things like Thickness, Default Bend Radius, the types of Stamps allowed, and the BendTable which manages deduction values. If you wish to use Bend Deduction values, you need to define a BendTable column, directly after the DefaultBendRadius column. Each BendTable is to be a separately defined Excel file and you need to point to it from the master Sheetmetal Standards Excel file. Such as:
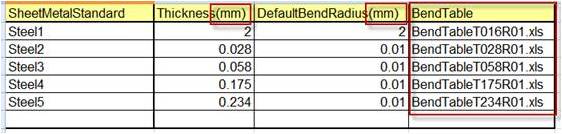
Then, in each of the BendTable Excel files you need to define the bend deduction value (a positive value makes the flat pattern “shorter”, a negative value makes the flat pattern “longer”).
![]()
The bend deduction value applied is based on where the actual bend angle falls within the user-defined range. In this table, the deduction value is applied to all bend angles from 0deg-90deg. If there is only one value defined in the table, that exact value is applied to ALL ANGLES regardless.
Also note that if you use an angle in your design that isn’t explicitly defined in the BDT, you will get a warning message in CATIA stating the obvious:

If you have more than one value defined in the table, according to the open angle the bend deduction will be read in the Deduction column or interpolated between values. You can define as many angle ranges and deduction values that you need, as long as they are listed in order from smallest to largest, because this is how CATIA determines the ranges and interpolates the deduction between the explicitly defined angle values (Zero is implied). For any angle greater than listed, the last deduction value is used.
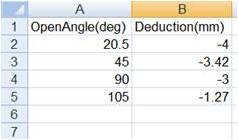
So in the image above, if our angle is 90deg the deduction is -3. If our angle is 105, the deduction is -1.27. For any angle greater than 90deg and less than 105deg, the deduction is interpolated using a ratio between the values.
NOTE: CATIA DOES NOT SIMPLY ADD OR SUBTRACT THIS VALUE FROM THE LENGTH OF THE FLAT PATTERN. IT IS A VALUE USED AS PART OF A MORE COMPLEX FORMULA THAT I’LL EXPLAIN NEXT. THIS IS WHY SOMETIMES IT DOESN’T “APPEAR TO BE WORKING”.
2. WHAT THE BDT VALUE REALLY MEANS (OR HOW TO FIND A MEANINGFUL VALUE TO PUT INTO THE BDT)
This gets REALLY deep, but a lot of this is documented in the help files. Unfortunately, what’s not clear from the help files is what the value in the BDT really is, how relates to the flattening formula, and how it impacts the final flat length. It’s often difficult to find out what value you should put in the BDT. So, let’s explore what is really going on “under the hood”.
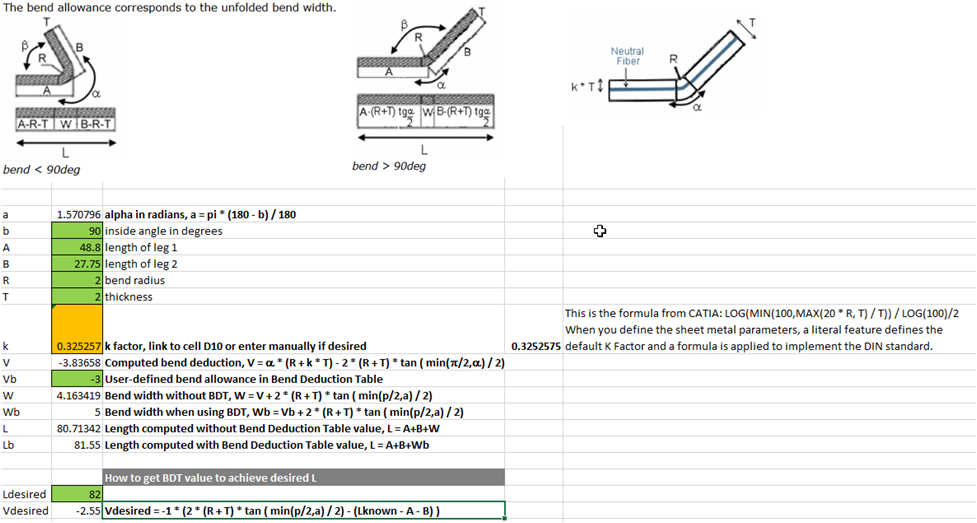
In a nutshell, L (flat length) = A + B + W:

Well, what’s W?
W represents the width of the bend, defined by the formula
W = V + 2 * (R + T) * tan ( min( pi/2,a) / 2).
So where does the BDT value come into play? The variable V in this formula is the user-defined (or interpolated) value pulled directly from the BDT. In the case where there are no BDT tables defined, V is calculated with a different formula using the K-factor (DIN standard formula).
So how do you find a meaningful BDT value if you want to hit a desired L (flat length)? Rearrange the formulas to solve for V. I’ve done this in the spreadsheet below. The purpose of this particular spreadsheet is to allow you to enter the desired flat pattern length and return the value you should use in the BDT to achieve it (based on known values for A, B, angle in degrees, thickness, bend radius).
I’ve protected the cells that contain formulas so they can’t be selected/broken; only the highlighted cells can be edited so you can enter your user-defined values. This spreadsheet also describes the math behind the scenes in more granular detail.
(Click on image to enlarge)
If you would like to request a copy of this spreadsheet, require a more thorough description of the Bend Deduction Tables, or would like a demonstration of CATIA Sheetmetal capabilities, please contact your local Inceptra representative.
Article compiled by Jason Curtis
Director, Applications Engineering
Inceptra LLC